Picture this: you notice a draft of cold air sneaking into your home every time you open or close your garage door. Annoying, right? Well, the good news is that you might be able to fix it yourself! In this article, we’ll answer the burning question on your mind: “Can I replace the garage door weather-stripping myself?” So, buckle up, grab your toolbox, and let’s get started!
You might be wondering why it’s even necessary to replace the weather-stripping on your garage door. Simply put, weather-stripping plays a crucial role in keeping unwanted elements out and maintaining a comfortable temperature inside your home. But can you take matters into your own hands instead of calling a professional? That’s the question we’re here to answer.
Now, I know what you’re thinking: “But can I handle this kind of DIY project?” Don’t worry, we’ve got you covered! In this article, we’ll break down the process into simple steps, providing you with all the information and guidance you need to know. By the time you finish reading, you’ll feel confident enough to tackle this task and bid farewell to those pesky drafts for good. So, let’s dive in and find out if you’re up to the challenge of replacing your garage door weather-stripping yourself!
Want to know if you can replace the weather-stripping on your garage door yourself? Absolutely! Here’s a step-by-step guide to help you with the process:
- Measure the length of the weather-stripping you need to replace.
- Clean the area where the new weather-stripping will be installed.
- Cut the new weather-stripping to the measured length.
- Attach the weather-stripping using adhesive or screws.
- Test the door to ensure it seals properly.
With these simple steps, you can replace the garage door weather-stripping on your own!
Can I Replace the Garage Door Weather-Stripping Myself?
Replacing the weather-stripping on your garage door is a task that can be tackled by homeowners with a bit of DIY experience. It is an essential maintenance task that helps to keep the elements out and maintain the energy efficiency of your garage. In this article, we will outline the steps involved in replacing garage door weather-stripping, the tools and materials you will need, and provide tips and guidance to ensure a successful DIY project.
The Importance of Maintaining Garage Door Weather-Stripping
Garage door weather-stripping plays a crucial role in preventing drafts, water, and pests from entering your garage. It also helps to insulate the garage, keeping it warmer in the winter and cooler in the summer. Over time, weather-stripping can become worn, cracked, or damaged, compromising its effectiveness. When this happens, it is important to replace the weather-stripping to maintain the functionality of your garage door.
Replacing the weather-stripping on your garage door is a relatively straightforward task, but it does require some basic tools and materials. Before you begin, gather the following items: a tape measure, a utility knife, a screwdriver, a pry bar, a hammer, a nail set, a paint scraper, a caulk gun, weather-stripping adhesive, and the new weather-stripping material. Once you have everything prepared, follow these steps to replace the garage door weather-stripping:
- Start by removing the old weather-stripping. Use a screwdriver to remove any screws holding it in place, and then gently pry it away from the door using a pry bar or a putty knife.
- Inspect the garage door for any damage or rot. If you notice any issues, address them before proceeding with the installation of the new weather-stripping.
- Measure the length of the garage door opening where the weather-stripping will be installed. Cut the new weather-stripping material to fit using a utility knife.
- Apply a thin bead of weather-stripping adhesive along the edge of the garage door where the weather-stripping will be installed.
- Press the new weather-stripping into place, starting from one corner and working your way around the perimeter of the door.
- Secure the weather-stripping in place by nailing it with small finish nails. Use a nail set to sink the nails slightly below the surface of the weather-stripping.
- Finally, use a paint scraper or a putty knife to remove any excess adhesive or caulk, and allow the weather-stripping to cure according to the manufacturer’s instructions.
By following these steps and using the necessary tools and materials, homeowners can successfully replace the weather-stripping on their garage doors. It is a simple yet effective way to improve the insulation and energy efficiency of your garage while also keeping the elements at bay.
Benefits of DIY Garage Door Weather-Stripping Replacement
Choosing to replace the garage door weather-stripping yourself offers several benefits. First and foremost, it can save you money. Hiring a professional to perform the task can be costly, especially when you consider the relatively simple nature of the project. By doing it yourself, you can avoid the expense of labor fees.
Additionally, DIY garage door weather-stripping replacement allows you to have control over the quality of workmanship. You can ensure that the replacement is done to your satisfaction, and you can take the time to address any other maintenance issues you may come across during the process.
Finally, DIY projects can be satisfying and empowering. Successfully completing a home improvement task on your own not only saves you money but also gives you a sense of pride and accomplishment. It is a great way to learn new skills and take an active role in maintaining your home.
Tips for Successful Garage Door Weather-Stripping Replacement
While replacing the weather-stripping on your garage door is a fairly simple task, there are a few tips that can help ensure a successful outcome:
- Clean the garage door thoroughly before installing the new weather-stripping. This will ensure proper adhesion and a clean finish.
- Measure twice, cut once. Double-check your measurements to ensure that the weather-stripping will fit properly and provide a tight seal.
- Consider using adhesive-backed weather-stripping for easier installation.
- Take your time and work carefully, especially when removing the old weather-stripping. Avoid damaging the garage door or any other components during the process.
- Consult the manufacturer’s instructions for the specific weather-stripping material you are using, as they may have additional guidance or recommendations.
By following these tips and taking your time, you can successfully replace the weather-stripping on your garage door and enjoy the benefits of a well-insulated and energy-efficient garage.
Conclusion
Replacing the garage door weather-stripping yourself is a feasible DIY project that can save you money and provide a sense of accomplishment. By following the proper steps, gathering the necessary tools and materials, and taking your time, you can successfully replace the weather-stripping and maintain the functionality of your garage door. Remember to clean the door surface thoroughly, measure accurately, and work carefully to ensure a tight seal and an effective barrier against the elements. Enjoy the satisfaction of a job well done and the benefits of an energy-efficient garage!
Key Takeaways: Can I replace the garage door weather-stripping myself?
- Yes, you can replace the garage door weather-stripping yourself.
- Make sure to measure the length needed and choose the right type of weather-stripping.
- Remove the old weather-stripping carefully and clean the surface before installing the new one.
- Attach the weather-stripping firmly using adhesive or nails, following the manufacturer’s instructions.
- Regularly inspect and replace the weather-stripping as needed to ensure a proper seal and energy efficiency.
Frequently Asked Questions
Are you wondering if you can replace the weather-stripping on your garage door yourself? Look no further! We have the answers to your questions right here.
Why should I replace the garage door weather-stripping?
Replacing the weather-stripping on your garage door is crucial for several reasons. First, it helps to keep out drafts, preventing cold air from seeping into your garage during winter and hot air during summer. Second, it improves energy efficiency by sealing gaps that may be causing air leaks. Lastly, it helps to keep pests, dust, and debris from entering your garage, maintaining a clean and safe environment. So, replacing the weather-stripping not only helps with temperature regulation but also ensures a more comfortable and secure space.
Furthermore, replacing the weather-stripping can also prevent potential damage to your garage door. When the weather-stripping is worn out or damaged, it can cause friction and strain on the door, leading to unnecessary wear and tear. By replacing it, you can prolong the lifespan of your garage door and avoid costly repairs down the line.
Can I replace the weather-stripping on my garage door myself?
Absolutely! Replacing the weather-stripping on your garage door is a task you can tackle on your own. With the right tools and a bit of patience, you’ll be able to complete the job successfully. There are various types of weather-stripping available, such as adhesive-backed strips, bottom seals, and threshold seals. Make sure to choose the right type for your garage door to ensure a proper fit.
Before you begin, take the time to measure the length of your garage door and purchase enough weather-stripping to cover the entire perimeter. Start by removing the old weather-stripping and cleaning the surface thoroughly. Then, carefully install the new weather-stripping, following the manufacturer’s instructions. Take your time and double-check your work to ensure a tight seal. Remember, if you’re unsure about any step of the process, it’s always a good idea to consult a professional.
How often should I replace the weather-stripping on my garage door?
The frequency of weather-stripping replacement depends on several factors, such as the climate you live in and the level of wear and tear on your garage door. As a general rule of thumb, it’s recommended to inspect your weather-stripping annually for any signs of damage or deterioration. If you notice cracks, gaps, or tears, it’s time to replace the weather-stripping. Additionally, if you feel drafts or notice an increase in your energy bills, it may indicate that the weather-stripping needs to be replaced. Regular maintenance and prompt replacement will ensure that your garage door remains well-insulated and efficient.
Keep in mind that weather-stripping materials can degrade over time due to exposure to the elements, temperature fluctuations, and general wear and tear. Therefore, proactive replacement is key to maximizing the effectiveness of your weather-stripping and to maintain a properly sealed garage.
What tools do I need to replace the weather-stripping on my garage door?
Replacing the weather-stripping on your garage door doesn’t require a comprehensive tool kit. In fact, you only need a few basic tools to get the job done. Here are the essentials:
1. Tape measure or ruler: To measure the length of your garage door and ensure you purchase the right amount of weather-stripping.
2. Utility knife or scissors: To cut the weather-stripping to the appropriate length.
3. Scraper: To remove any old weather-stripping and adhesive residue from the surface of your garage door.
4. Cleaning solution and rag: To clean the surface before installing the new weather-stripping.
5. Adhesive: Depending on the type of weather-stripping you choose, you may need adhesive to secure it in place.
Make sure to have these tools handy before you start the replacement process, and always follow safety precautions to avoid any accidents.
Can I use any type of weather-stripping on my garage door?
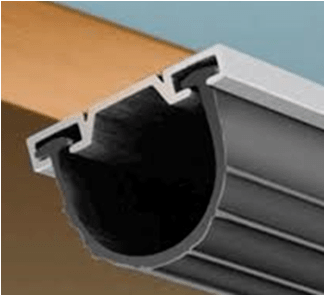
No, not all weather-stripping is suitable for garage doors. It’s important to choose weather-stripping specifically designed for garage doors to ensure a proper fit and optimal performance. Garage door weather-stripping typically comes in adhesive-backed strips, bottom seals, and threshold seals.
Adhesive-backed strips are easy to install and can be attached to the sides and top of the garage door to seal any gaps. Bottom seals are designed to be attached to the bottom edge of the door, creating a seal between the door and the floor. Threshold seals are installed on the garage floor in front of the door to provide an additional barrier against drafts, pests, and debris.
Before purchasing weather-stripping, carefully measure your garage door to determine the length and type needed. It’s also a good idea to consult the manufacturer’s recommendations or seek advice from a professional to ensure you choose the right weather-stripping for your specific garage door model.
Replacing the garage door weather-stripping is a task you can do on your own. It’s important to choose the right weather-stripping and measure accurately.
Remember to clean the area before installing the new weather-stripping and make sure it is properly aligned and secured. With some patience and careful work, you can improve the energy efficiency of your garage and keep out unwanted elements like dust and pests.